literature

Nelvana costume redesign process

Deviation Actions

dierat's avatar
By
Published:
2.6K Views

Literature Text

I recently uploaded a costume redesign that I did for the comic book character Nelvana of the Northern Lights, and I also wanted to share the process that I went through when creating this alternate design including research and thumbnailing.

The character


Debuting in August 1941, Nelvana was one of the first female superheroes and predates Wonder Woman by two months. She was created by Adrian Dingle during the golden age of Canadian comics in World War II. In this period there was a restriction on the importation of non-essential US products, including American comics, that created a vacuum for Canadian comic writers and artists to fill with local creations. The comics they made were in black and white with colored covers (generally called the "Whites" now) and featured heroes native to Canada who fought the Axis powers in WWII (as did Superman and Wonder Woman for the United States).

From wikipedia:
Nelvana is a powerful Inuit mythological figure, protecting the people of the North with her superhuman abilities. She is the daughter of a mortal woman and Koliak the Mighty, King of the Northern Lights. The gods were outraged with Koliak and his marriage to a mortal woman, and therefore is no longer visible, although his spirit is manifested in the form of the Northern Lights. Nelvana draws on the powers of her father and the Northern Lights to fight super-powered Nazi agents in the North.
Dressed in a fur-trimmed mini-skirt, knee-high boots, matching gloves and adorned in a headband and magical cape, Nelvana’s superhuman powers include the ability to fly at the speed of light on a giant ray of the Northern Lights. She was also capable of calling on the powers of her father. She can melt metal and disrupt radio communications. Nelvana is telepathic and can turn invisible, as well as change her physical form.

In 2013 I discovered Nelvana of the Northern Lights through a kickstarter campaign to print a compilation of her comics. I found the history around the creation of the character fascinating and was also intrigued by the inspiration for the character, but I found her design a bit old-fashioned (which makes sense considering she's been out of print for over 70 years), so I decided to play around with how I would update her costume if I were (hypothetically) going to relaunch her series.

Thumbnailing


What I found most interesting about Nelvana was her Inuit heritage, but her original design didn't reflect this aspect of her character. She has dark hair and some fur trim on her skirt, but that's it. This was the biggest change I wanted to make in her design, so I started with researching Inuit clothing and hair styles.
 
A pattern in Inuit clothing that I really liked are flaps that extend from the tunic down the front and back of the wearer with either a curved or angular end and a thick line following that shape a few inches in from the hem of the flap. Most of the costume variations I explored used this pattern.
Nelvana redesign - costume thumbnails by dierat
I sketched up 40 design thumbnails based on the research I had done up to this point. Each thumbnail sketch represents a possible general design that I could pursue. I tried to incorporate aspects of both traditional Inuit clothing design and the original Nelvana costume in each thumbnail.

As I went through making these thumbs, I continually looked back at the ones I'd already made, which ones I liked so far, and what other variations I could make on them. Because of this, the designs tend to get more and more similar over time and converge on a design I'm happiest with. My favorites from these were the last two - 39 and 40 - because I found them visually interesting and also a good mix between the original costume and Inuit clothing design.

The purpose of thumbnailing is to get out a bunch of different variations using a process that makes each variation very cheap. And because they are rendered so simply, and without color, it's easier to compare them based on the shapes of the design alone. Figuring out the general direction that you want to go in quickly will save a lot of time later on when you get to a rendering stage where changing the shapes of a design will take much more time.

For the actual thumbnail drawings, I use a simple black silhouette of a figure, copy-pasted a bunch of times, and draw the costume pieces on separate layers on top. That allows me get the general shape of a design without spending time on details and to swap different pieces to create new thumbs quickly. I think on average I spend about 30 - 60 seconds on each thumbnail.
Nelvana redesign - color thumbnails by dierat

I took the two designs that I liked the most and explored a few different color treatments on each. I tried to use the color palette that the original Nelvana design utilized, but I didn't like that direction at all. Instead I ended up using photos of the Aurora Borealis more for color inspiration since that is her namesake.


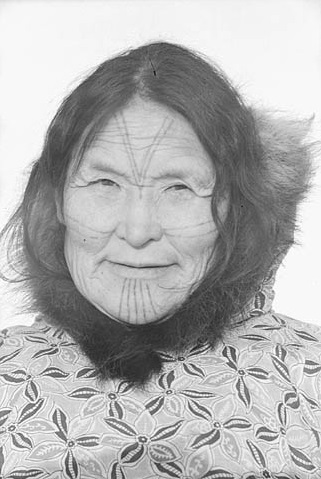
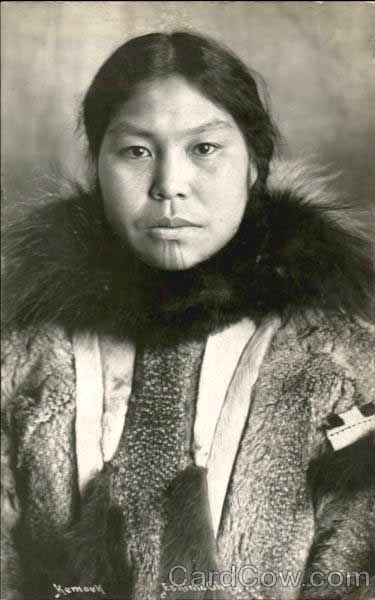
In the images that I had collected for Inuit clothing reference, I had seen a few facial tattoos. I thought that would be a nice detail to add to make the character more representative of Inuit culture, so I gathered some more research images.
Nelvana redesign - tattoo thumbnails by dierat

The pattern that I noticed the most was a series of line radiating from the mouth, nose, and or nose out to the edge of the face, sometimes with dots between the lines. These thumbs are mostly just copied directly from the photos I found since Nelvana's original design didn't have any similar design details that I wanted to incorporate.

I chose C34 because I found it elegant and somewhat reminiscent of stars and streams of light from the night sky.

You may notice that as I went through the different stages of thumbnailing, they became more detailed and specific. This is very purposeful because it's easier to plan out details of a design when you have the broad shapes around those details figured out. When choosing a tattoo design to use, I could compare that to the larger costume shapes and make sure the tattoo would fit or even mimic the patterns from that larger design.

Orthographic view

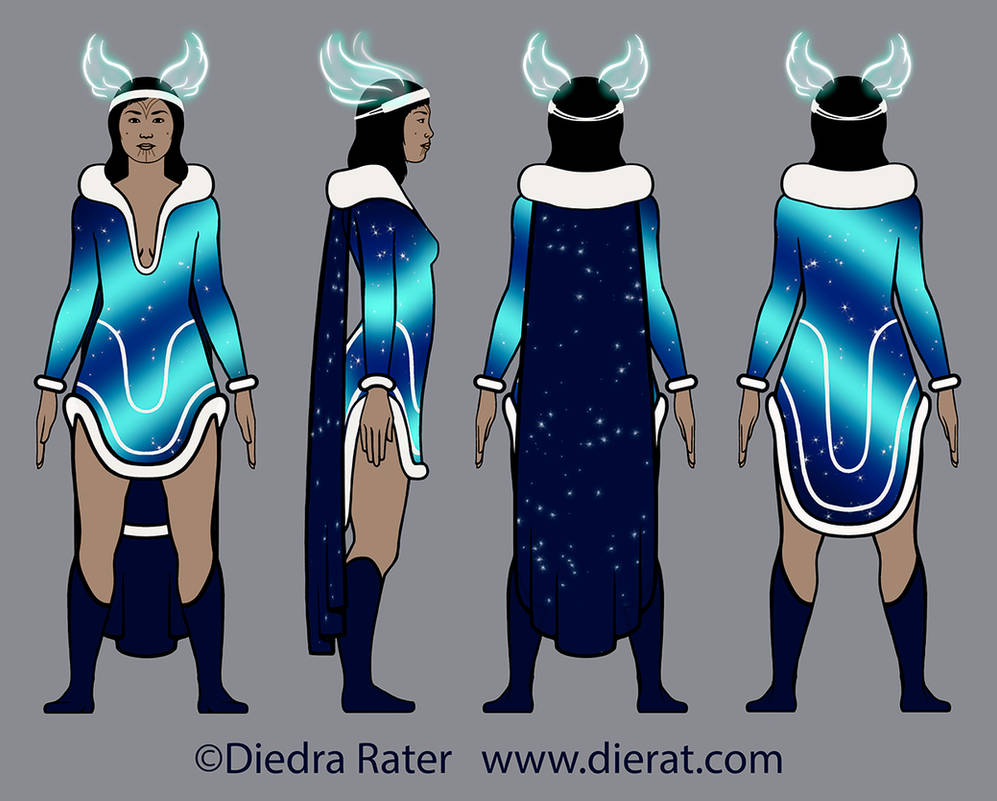
Now that I had my design sorted out, I could start on an image to show off the final design. I like plain orthographic views because, although they're not terribly flashy, they communicate what the design looks like from each angle and really makes you think about how it looks in the round.


Free 3D Model Reference Pack F - Pose 1
Free 3D Model Reference Pack F - Extras


I collected stock photos of people standing in simple poses that show the front, side, and back to use as reference for the figure. AdorkaStock is a great resource for this.

I drew out a template figure of sorts with no clothing or face so it could be reused in future character design projects. I left off the face at this stage because those details are highly specific to the character and will basically need to be drawn from scratch each time anyway.

After that, it was simply a matter of adding the design on top of the template figure. I like to work in grayscale while getting the forms down. I tried to keep the different sections of the body in separate layers to make it easier to add detail to each section separately.

You may notice that I dropped the trim on the cape at this point even though it was in the chosen thumbnail. That's simply because when I had it all drawn out, I decided the trim on the cape was just a little too much and distracted from the design of the front of her costume, so I left it out. The purpose of the thumbnail is to reduce the number of changes that you have to make later when changes are more time-consuming, but you're not shackled to the choices you made earlier in the process.
Nelvana redesign - final design by dierat

Next I added the color treatment that I had chosen from my color thumbnails on the layers for each section for the final orthographic view.

Additional research

While working on this redesign, I also researched other aspects of Inuit culture to get into the mood and mindset of the culture a little more. Designing and drawing a character from an oppressed and ignored culture is a very delicate issue as a white American, so I wanted to have a little extra background knowledge even if that didn't go into the actual design.


I looked up traditional Inuit music and found Inuit throat singing, which is super cool and was great to listen to while working. I highly recommend checking it out!

I also searched for films about and featuring Inuit people, but I only found one - Atanarjuat: The Fast Runner. This one turned out to be a great resource for depicting someone of Inuit descent because they hired only Inuit actors, which is very cool.

The end

You made it to the end! Go team you! I hope this gave you some new knowledge or inspiration to incorporate in your own work. Feel free to reach out with questions, here in the comments or in a private message, or requests for other tutorials you'd like to see from me.

Have a great day! :)


Resubmitting this as a tutorial because I finally figured out why I was only allowed to submit it as a journal before. (In case you're wondering, it's because I had thumbnails linking to another deviant's work in the post. Using text links instead allows you to submit it into another category.)
© 2017 - 2024 dierat
Comments0
Join the community to add your comment. Already a deviant? Log In